Friday, May 16, 2014

Sunapee Star has Arrived to Craftsy!!


Thanks to Lois Kindley over at www.creativegypsy.me for this sample 
& to Lisa Teichman for coming up with the name!
Special Thanks to Susie Boots, RenĂ© Therrien, Patty Magaw, Lisa Teichman, & as always Lois Kindley!  for testing this pattern and giving me advise.   
RenĂ© you’re priceless!!!

Wednesday, November 6, 2013

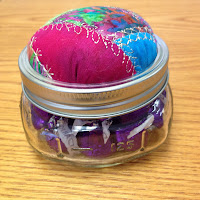
Pincushion Trinket Jar has arrived!

Quiltarie.etsy.com


Quiltarie.etsy.com
 Pin Cushion / Trinket / This and That Jar!
Quiltarie.etsy.com
 Added two fun colors today! 
Quiltarie.etsy.com

Quiltarie.etsy.comQuiltarie.etsy.com


 More color combos to follow! 
Thanks for stopping by!  Marie

For lots of exciting creations visit:

WIP Wednesday at Freshly Pieced

Wednesday, October 30, 2013

New Tutorial - Coffee Cup Cozy

New today!
I have uploaded my free 


I would love to know how this pattern worked for you - Please leave a comment!!

You can also visit me on Craftsy!

Thanks and enjoy!!
Marie 

Wednesday, September 25, 2013

Coaster Tutorial

I recently presented a Boutique Night for my guild Souhegan Valley Quilters Guild


We are holding our Quilt Show and along with over 115 member quilts on display, there's a raffle for 31 beautiful mini quilts, vendor basket raffle, and a boutique full of handmade items! 

For my boutique night items I presented 2 coaster variations, one coffee mug cozy, and a tissue holder.  

I thank Pinterest and the many creative people I have run into at quilt shows and in blogland for these ideas as Not One of them is new or my original design.
 I did make up simple patterns on how to make them and will post all eventually for anyone to use as they wish!!

Here are the pictures and pages for the coasters:

One: Diagonal Folding - note advantage is that it is folded on the bias so it's easier to insert the wine glass stem...  


Two: Straight Folding...   

I have lots of pictures along the way but GTG for now...
So enjoy the TUTs and send me pictures of what you make!
 
Fun fact - I gave a set of these to my neighbor and friend and she turned around and ordered a bunch for bridal shower favors!!


These will soon be listed on Etsy - as soon as I find time!


Have a wonderful week!

Thursday, April 25, 2013

Scrap Panel Help!!


So I have had some questions....  First from my tester... who I gave a kit to BUT forgot to include the 2" x 4 1/2" scrap.... So she just attached the pieces to one another and found that it was 'wonky'!!  


Then from a customer who purchased the pattern.  It is always great to hear from people who use my patterns so that I get hands on information on what I need to add to make the patterns more user friendly!  Drop me an email any time with questions. I would also LOVE to see pictures of what you create!! email: quiltarie@gmail.com

So... here is how I make the scrap panel insert!!  

I start with a piece of light colored 2" x 4 1/2" scrap.  I lay two pieces of fabric - right sides together near the top of the scrap being careful to cover the top of the scrap.  I sew them down to the scrap at an edge as shown below.  I then trim the excess scrap hanging below the sew line, iron fabric open, then place the next bit of fabric at another angle.  I drew the following in the computer to help you better understand what I do.....

(click picture above to open downloadable/printable PDF file)

REMEMBER:
SEW - TRIM - IRON! - REPEAT!

If you are interested in this pattern it's available for download in my Craftsy pattern where you can download this pattern is: